Sketching figures is one of the most satisfying—and most challenging—skills in any artist’s toolkit. Whether you're capturing a fleeting pose in a crowded café or constructing a character for a new project, maintaining proper proportion in your figures is crucial for believability and visual harmony. Today’s Tuesday How-To is all about mastering this fundamental skill, and understanding how it fits into your larger sketchbooking process.
Let’s get into how to keep your figures proportional and where this step lands in your 8 Pages of Sketchbooking. Spoiler: it’s all about Page 3: Structural Foundations.
Why Proportion Matters in Figure Drawing
Before we talk technique, let’s quickly cover why proportion is worth your attention.
Proportion is what gives your figures realism, balance, and visual clarity—even when you're stylizing. A figure with overly long legs or too small a torso (unless you're exaggerating intentionally) will read as awkward or off. Proportion is also what helps your sketches feel right intuitively, even to non-artists.
When done correctly, proportion lays the groundwork for expressive poses, convincing anatomy, and dynamic characters.
Step-by-Step: How to Maintain Proportion in Your Figures

1. Use the Head-Count Method
One of the simplest ways to maintain proportion is using the classic head-count system. In this method, you measure the height of your figure in terms of how many "heads tall" it is.
- Standard adult figure: 7.5–8 heads tall
- Stylized heroic figure: 8.5–9 heads tall
- Child figure: 5–6 heads tall
- Cartoon styles: may vary wildly but should still be consistent
Use the first head (the actual skull) to “stack” and plan the placement of the chest, hips, knees, and feet. This ensures your figure has believable proportions from the start.
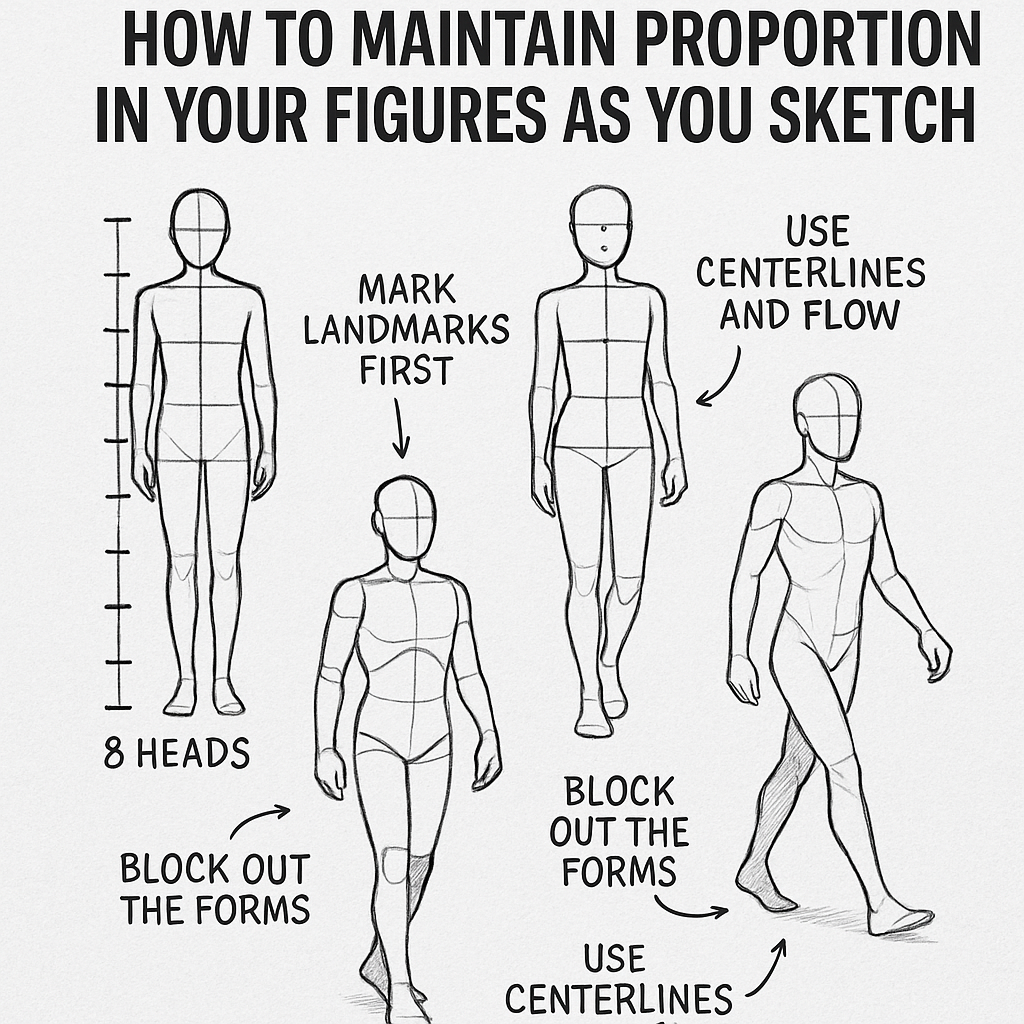
2. Mark Landmarks First
Start your sketch by placing major landmarks:
- Chin
- Nipples
- Navel
- Hips
- Knees
- Ankles
These help define your figure’s natural rhythm and breaks, giving you reference points to correct proportion errors early on.
3. Block Out the Forms
Before refining anatomy, block out the basic volumes: head, ribcage, pelvis, limbs. Think in 3D—use cylinders and spheres, not just lines. This keeps your proportions consistent from different angles and makes foreshortening easier later.
4. Use Centerlines and Flow
Draw a centerline down the torso and limbs. These guide the pose and keep everything aligned. If your torso’s centerline is curving one way and your pelvis the other, you’ll quickly see if something is out of proportion.
You can also sketch the "line of action" to guide your figure’s movement and help maintain balanced proportion across dynamic poses.
5. Check Against Real Reference
It’s easy to skew proportion without noticing. Use photo reference (or your own reflection) to double-check the relationships between body parts. Where do the wrists fall when arms are at rest? How long is the thigh relative to the calf?
Even 5 minutes of comparing your sketch to real bodies will sharpen your proportional sense.
6. Simplify into Shapes, Then Refine
Once your proportions look good, you can start refining muscle groups, clothing, and gestures. But don’t rush! If the base structure is off, the whole drawing will feel “wrong” no matter how detailed the finish.
Simplify first, polish later.
Common Proportion Mistakes (And How to Avoid Them)
- Overlong limbs: Happens often in stylized art. Use reference or a grid to keep things under control.
- Tiny heads: If your figure looks “super tall,” you may have shrunk the head too much.
- Misaligned joints: Shoulders, hips, and knees should correspond to each other in a natural rhythm. Use horizontal guidelines.
- Short torsos: Newer artists often squash the space between the ribcage and pelvis. Be generous—humans have long torsos!
Tools to Help With Proportion
- Proportional grids: Use a lightly sketched 8-head grid to guide figure placement.
- Mannequins or pose dolls: Useful for posing and measuring.
- Digital tools: Apps like Posemaniacs, Line of Action, or Magic Poser can rotate 3D models and overlay proportion lines.
- Gesture drawing warm-ups: Loosens your hand and helps internalize proportions quickly.

How This Fits into the 8 Pages of Sketchbooking
So where does proportion live in your sketchbook system?
Page 3: Structural Foundations is the home of proportion.
This is the part of your sketchbook where you rough in form and layout. You’re not detailing yet—you're thinking like an architect sketching blueprints. This is where head counts, gesture lines, and form blocking belong.
What happens in Page 3:
- Rough proportion planning
- Pose breakdowns
- Foreshortening experiments
- 3D form construction
- Placement and spacing of multiple figures
The goal here isn't to produce perfect drawings, but to think spatially and structurally. When your proportions are nailed down at this stage, it gives every future page—especially Pages 4 (Anatomy) and 5 (Expression & Detail)—a solid base to build on.
Practice Prompts for This Week
If you want to strengthen your figure proportions, try these sketchbook drills:
- 8-Head Grid Challenge: Draw 5 figures using a head-count grid to guide proportion. Vary the body types!
- Gesture-to-Structure: Take 10 gesture poses and turn them into proportionally accurate structures using cylinders and spheres.
- Mirror Selfie Sketches: Use your reflection to check real-time proportion. Sketch what you see.
- Style Shifts: Draw the same figure as a realistic 8-head figure, a 6-head comic character, and a 4-head chibi. See how proportion changes but rhythm stays.
Final Thoughts
Maintaining proportion is a discipline you build over time—and it starts with intentional sketching. Don’t wait until you’re “doing final linework” to care about it. Let your sketchbook be your lab. Rough in your figures on Page 3 with care, and the rest of your pages will thank you.
Remember: if your figure doesn’t feel right, check the structure before you erase the detail.
